How To Recover Lost Data from Your Hard Drive
Step 1: Connect the Hard Drive to Another Computer
Before you can do any work on the crashed drive you will need to remove it from the current machine (unless it is an external drive that has crashed) and connect it to another machine as a secondary drive. The best way to do this is to buy and use a USB to IDE/SATA adapter. This is the cheapest multi-functional USB 3 option and I prefer USB 3 because it is a lot faster.
If you don’t have one available then you may be able to connect the drive to another desktop computer internally as a secondary drive, though this means pulling apart another computer to install the crashed drive. If you do, make sure that the machine detects the drive in the BIOS or you won’t be able to access it once the computer starts up.
Step 2: Try to Copy the Data to Another Drive
After you connect the drive to another computer either internally or with the USB adapter, check to see if you can browse the contents of the drive. It is worth trying because maybe it wasn’t the drive itself that actually crashed. If you can, try to copy data off that you would like to recover. This might not work if you are trying to recover data from a dead hard drive but there is a chance that only the operating system is corrupt and the user data is still fine.
Step 3: Download and Try Data Recovery Software
If you can’t manually copy the user data off then you can try to recover it using data recovery software. Whatever you do, do not write anything to the drive that you are trying to recover data from. This means you should not install the recovery software onto the drive that you are trying to recover data from. Doing so could actually overwrite files that are still hidden there and that you can still restore.
PC Hard Drive Recovery:
Option 1: Recuva
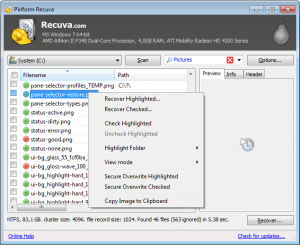
Recuva software for hard disk recovery
Click here to get Recuva which is a free hard drive recovery tool from Piriform (the makers of CCleaner) and is one of the best free PC data recovery tools available. Even if the drive has been formatted, Recuva can scan the drive recover files. If the basic scan fails, there is also a deep scan to discover more deeply-buried results. There is also a portable version if you don’t want to install the full version.
When you launch Recuva, you will be presented with a wizard that will guide you through restoring your files. First you will choose the type of file you need to recover, then the location, and then start the scan or choose “Enable Deep Scan” if the quick scan doesn’t find the files you need to recover.
Option 2: PC Inspector File Recovery
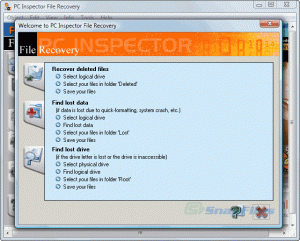
PC Inspector for Hard Disk Recovery
Click here to get PC Inspector File Recoverywhich is the recovery software that I originally featured in this article back in 2006. It’s still a decent recovery tool and can be used if you are unable to recover the files you need with Recuva.
When you launch PC Inspector File Recovery, you will need to choose your language. After this, you will be presented with a welcome screen giving you three options.
The first option is “Recover Deleted Files”. This allows you to restore files that have been permanently deleted from the drive. This will only work if the deleted file has not already been overwritten.
The second option is “Find Lost Data”. This allows you to recover data that has been lost due to a system crash. If you choose this option, you will be asked for the “start cluster” and “end cluster”. Leave the default settings to scan the whole drive. The scan could take a couple of hours depending on how large your drive is.
The third option is “Find Lost Drive”. Use this option if your drive letter is not showing up in Windows Explorer or My Computer. It will attempt to connect to the drive and if successful, allow you to browse the data.
Option 3: Hiren’s BootCD
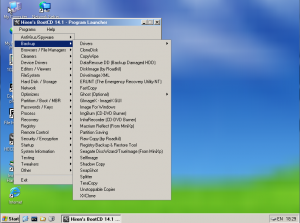 Click here to get Hiren’s BootCD which allows you to boot into a slimmed down version of Windows called MiniXP from the bootable CD or bootable flash driveand run diagnostic utilities on a problematic computer. Recuva is one of the utilities that comes bundled with Hiren’s so you can run it right from the CD. This is helpful if you don’t have a USB to IDE/SATA adapter or just don’t want to pull the drive from the machine.
You will need to connect another drive to the machine such as a USB flash drive or an external hard drive so you will have a place to copy your recovered data to.
Option 4: GetDataBack
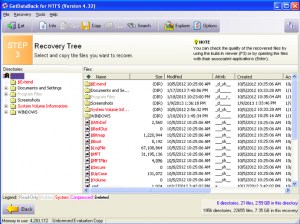
Get Data Back for hard drive data recovery
If the free utilities are not doing the trick then Click here to get GetDataBack give a try. GetDataBack is sold in two different versions, one for NTFS and the other for FAT files systems. If you want to make sure it’s going to work first before you pay $79 for the NTFS version or $69 for the FAT version, they do have a demo version that will allow you to see what files it can recover. This gives you a zero cost option to check if your hard drive data recovery will be possible. If you like what you see, you can purchase the full version right then and there without even having to close out of the program. I personally have had lots of success with GetDataBack when other recovery methods have failed.
After launching GetDataBack you will be asked to pick from a selection of data loss scenarios that the drive experienced. If you aren’t sure, just select “I don’t know.” After this you will select the drive, the partition on that drive, and then start the scan.
Mac Hard Drive Recovery Software:
MiniTool Mac Data Recovery
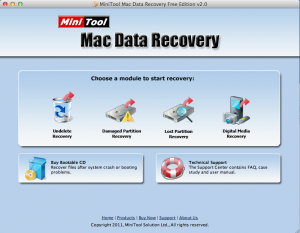
Mac Data Recovery for hard drive data recovery
Click here to get MiniTool Mac Data Recoverywhich is a data recovery tool specifically designed for Mac OS X. It’s one of the few free Mac data recovery programs which is why I have featured it here, however, it still has a 1GB recovery limit. After that you must pay for the full version.
When you launch MiniTool you will be presented with 4 options based on the type of recovery you would like to perform. Undelete Recovery, Damaged Partition Recovery, Lost Partition Recovery, and Digital Media Recovery. Once you choose your recovery type, you will then be asked to select the drive that you want to recover from.
Disk Drill
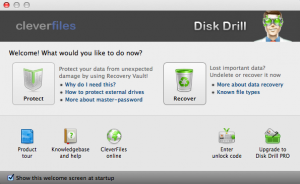
Disk Drill for hard disk data recovery
Click here to get Disk Drill which is one of the newest recovery apps for the Mac OS X platform and has quickly been deemed one of the best. You can download the Basic Edition for free which will allow you to see a list of the files that you can recover. If the files you want to recover are detected, you can then purchase the Pro Edition and move forward with the recovery.
When you launch Disk Drill, you will be presented with the option to either Protect or Recover. You will want to choose Recovery to begin your recovery process. You will then choose your drive and then select either Quick Scan (for deleted files) or Deep Scan (for lost data). Once it is finished you can select the files you wish to recover.
Step 4: (If required) Use a Data Recovery Service
 And finally, if none of these methods work or if you were unable to follow the steps, then you will probably need to send the drive off to a data recovery service. A word of warning these companies are typically high tech and therefore have a corresponding price. These are real professional Data Recovery services.
Click to open Gillware.com. Gillware is one of the top recommended data recovery services in the industry. Some of the benefits they offer are immediate online price estimates, no up front payments, and the ability to see a list of all the recovered files through their website to ensure the files you need are listed before paying a dime.
Step 5: (Optional) Put Your Hard Drive in the Freezer to Recovery Data
If all other methods fail, there is one other non-traditional method that may allow you to recover files on your own. To learn more, check out my previously posted article titled Put Your Hard Drive In The Freezer To Recover Data. This does not apply to solid state drives. This may be a pre-emptive action with a clicking hard drive that has not yet crashed (that is a serious warning sign). The idea is that an overheated and slightly warped disk and other components may shrink enough to briefly function. Use extreme caution, and if the data is at all important, your best bet may be to spend the money and go with a professional data recovery service. I and several people I know have had success doing this, so yes it is strange but it can sometimes work!
ReplyDeleteHi Dear,
Thank you a lot for providing individuals with an extremely remarkable opportunity to read articles and blog posts from this website. It is often so excellent and also jam-packed with a great time for me and my office fellow workers to visit your web site really thrice in 7 days to learn the latest stuff you will have. And of course, I’m so actually pleased with the remarkable opinions served by you. Selected two areas in this posting are particularly the most suitable I have had.
Our company provides HDDs, SSDs, Servers, and RAID arrays certified data recovery services with a 99% Success Rate.
hdd repair